More Decisions and Forms
- MDN - HTML Forms Guide - A good thorough read through of html forms and how to work with forms via JavaScript.
Forms and JavaScript
To follow along with this exercise, you will need to download and un-zip this starter kit.
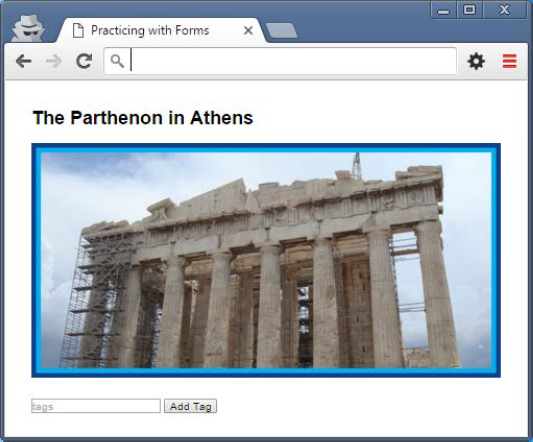
Forms offer a very simple and effective way to foster user interaction on a web page. There are many fields that can be utilized to create a very rich and meaningful experience, while at the same time all being highly accessible to a developer. In this example, we’ll walk through a very simple form setup to allow a user to add tags to an image being displayed. The interface will appear similar to the following:
Figure 1. Sample web page interface
Forms allow for direct access to all elements contained within them. All that is required is that the form fields have a name attribute. This can then be referenced on the form via its elements property. Let’s begin by adding an event listener for the form’s submit event.
Submitting a Form
Form submission is a unique type of event in that the event is triggered not only by the form directly (e.g. pressing enter when the form is active) but also by clicking on a submit button. There are two ways to include a submit button in the form:
- Including an input element with the type attribute value of submit
- Including a button element with the type attribute of submit
For this exercise we will use an input element.
Type the following code for adding the event listener in the project’s main.js file:
Example 1. Add an event listener for form submission
document.querySelector('.feature.frm ')
        .addEventListener('submit', function (evt) {
          console.log('Form submitted... ');
        });
This won’t work the way we likely expect and that’s because form submission already has a default behaviour, which is to submit the form’s contents to the action attribute value via the HTTP method in the method attribute. For this example we won’t be using either of those attributes (as we don’t ever want to send any data away) so we will need to prevent the default behaviour. More about forms can be found here.
Example 3. Form and form element access
document.querySelector('.feature.frm ')
        .addEventListener('submit', function (evt) {
          console.log('Form submitted... ');
          evt.preventDefault();
        });
Note that the tags input element can be directly referenced by name from the form’s elements property. The way we’ve achieved this here only works if the element’s name is a valid JavaScript identifier (e.g. does not contain any hyphens), so be careful when naming your html form fields (although, there is another way to reference fields with invalid identifier names).
Now that we have access, we simply need to pull the value out of the tags variable and assign it to the p.feature.tags innerHTML:
Example 4. Updating the tags for the image
document.querySelector('.feature.frm ')
        .addEventListener('submit', function (evt) {
          var frm = evt.target;
          var tag = frm.elements.tag;

          // insert a '# ' before the tag for aesthetics
          document.querySelector('p.feature.tags ').innerHTML += '#' + tag.value;
          evt.preventDefault();
        });
In the example above, we’ve used the += operator. This operator simply concatenates the right-side value to the left-side variable (in this case innerHTML). You should now be able to add tags to your image:
Figure 2. Tag added to the image

Great! Except that the form still has the value ‘history’ displayed. It would be good if we removed this after adding the tag:
Example 5. Ensuring the tag field is empty after adding a tag
document.querySelector('.feature.frm ')
        .addEventListener('submit', function (evt) {
          var frm = evt.target;
          var tag = frm.elements.tag;

          // insert a '# ' before the tag for aesthetics
          document.querySelector('p.feature.tags ').innerHTML += '#' + tag.value;
          tag.value = '';
          evt.preventDefault();
        });
Fantastic! Except that if we add additional tags they are going to be placed right beside the previous one (i.e. there is not space between individual tags). Make an update to your code to ensure there is a space between each tag when they are added (use what you alreadyknow to make this happen).
Form Validation
Okay, so far so good… but we can do better. As the solution is, it’s possible to add empty tags for the image, which is not something we want to allow. Some validation should be performed on the tag field’s value before we update the p.feature.tags element. This can easily be done with some simple decision logic. In this case, we need to check the value of the tag field is not empty before we add the tag.
Add the following code to enforce the non-empty value condition:
Example 6. Ensuring the tag field is empty after adding a tag
document.querySelector('.feature.frm ')
        .addEventListener('submit', function (evt) {
          var frm = evt.target;
          var tag = frm.elements.tag;

          // ensure that there is a value in the tag field before adding a tag
          if (tag.value.trim() != '') {
            // insert a '# ' before the tag for aesthetics
            document.querySelector('p.feature.tags ').innerHTML += '#' + tag.value;
            tag.value = '';
          }

          evt.preventDefault();
        });
Here we have used the trim() function to eliminate any whitespace either before or after any non-whitespace characters. Once trimmed, the value will either be empty or just contain the non-whitespace characters entered.
So now we have prevented any empty tags from being added, but there should probably be a warning or error message displayed so the user knows that empty tags cannot be added. You will notice that there is a p.feature.error element included in the page and that it is currently hidden via the class of the same name.
Include an else statement to accompany the current if condition that will reveal the p.feature.error element whenever an invalid tag is submitted, the element will need to be hidden again once a valid tag is entered:
Example 7. Toggling the error display message
document.querySelector('.feature.frm ')
        .addEventListener('submit', function (evt) {
          var frm = evt.target;
          var tag = frm.elements.tag;
          var error = document.querySelector('p.feature.error');

          // ensure that there is a value in the tag field before adding a tag
          if (tag.value.trim() != '') {
            // insert a '# ' before the tag for aesthetics
            document.querySelector('p.feature.tags ').innerHTML += '#' + tag.value;
            tag.value = '';
            error.classList.add('hidden');
          } else {
            error.classList.remove('hidden');
          }
          evt.preventDefault();
        });
And that’s it! We have successfully added the ability to add tags for the displayed image.